Manage Roles
Overview
The Rights Management is subdivided into two functions: the User Management, which you access through the tab 'User' and the Roles Management, which you access through the tab 'Roles'. The dialog shows an overview of existing roles in the left area.

The roles are sorted alphabetically by name and are displayed with assigned symbols. As of waveware 11.200.821.30, optional descriptions can be stored to explain the intended use. If you select a role in the role list, it is in focus and all information, buttons and selected rights on the right side of the dialog relate to this role.
Create Roles
A role is a collection of rights and other specifications (Data restrictions, Client rights etc.), which can be allocated in one or several users.
A click on the button 'New' opens a dialog window, where the name of the new role can be specified.

A click on the green tick closes the window and shows the rights of your new role.
Assign Symbol
Symbols ease the view through the role structure, that you have created. Assign a marked symbol, while creating a role. Select the role and click the button 'Assign symbol'. A window is opened with the available symbols. Select a symbol and confirm your choice with the double click on the symbol or with the click on the green tick. In the list of the roles, the selected symbol shines before the relevant role.
Copy Roles
To copy an existing role, select a role from the list in the right area of the Roles Management. After a click on the 'Copy' button, a dialog window appears, where you must specify a name for the copy. Click on the green tick to create the copy.
From waveware version 11.200.5774.34 (December 2023 edition), the “Copy role” function also copies the field rights and action rights.
Rename Roles
Existing roles are available in a list at the left side of the Rights Management dialog. To change the names of the roles, select a role in the list with one click and switch to the edit mode of the entry in the listing with a second click. The name is completely marked and can be replaced. The change is finally confirmed with [Enter]. Leaving the field or marking another roll without confirming with [Enter] discards the change.
A role cannot be renamed if it is also a staff functional group.
Remove Roles
To remove a role, select them in the role list. Then, click the 'Delete' button to delete this role. After a confirmation message, the selected roles are removed from the system.
Edit Rights of a Role
To adjust the rights of a role use the clearly designed Rights Management. This appears, once you have chosen a role from the list.

The management of the rights are subdivided into six categories: 'Objects', 'Catalogs', 'Transactions', 'Global Rights' and 'Settings'. Divided in the categories, you find the relevant rights, which are listed according to the imported application packages:
- Objects
Edit rights of the object tables (e.g. rooms, housing technology, EDP etc.) - Catalog
Contains the rights of the catalog tables (e.g. companies, cost centers, costs etc.) - Transactions
Edit all rights of the transaction tables (e.g. Tasks, Activities, Withdrawals etc.) - Global Rights
Edit rights of the module and functions - Settings
Set particular properties for the user underlying a role. See section 'Settings'.
The following symbols were used for a clear design of the rights management:
 |
View data |  |
Add data |
 |
Edit data |  |
Delete data |
 |
Select data (i.e. the data of the table can be used in the Data Selection) |  |
Print data |
 |
Formula generator |  |
Catalog window |
 |
View document |  |
Add document |
 |
Edit document |  |
Delete document |
To set or remove all the rights of a column, right click on the desired column and then on the context menu 'Edit rights for this column'. In this way, all the rights for this column are set or removed.
Set all rights of a row where you mark the description of the row and then press the [space].
Field Rights
Field rights allow restrictions on rights for certain fields in a table. 'Do not view', 'Do not edit', 'Do not select' and 'Do not aggregate' are available as field rights. In the basic setting (no field rights set) all fields are always shown and can be edited.
Further down in the section "Field Rights From waveware Version 11.200.4370.22" you will find details on the configuration in later releases.
In the default setting, field rights are not evaluated. This function must first be activated in the Supervisor Options. Then all field rights are given. This is a negative rights system in which fields must be marked that, for example, may not be viewed.
Activate Field Rights
To be able to use field rights, it must be activated once in the Supervisor Options. Open the Data Managementclick the 'Supervisor Options' for the Data World, the rights of which you want to activate. Then, open the path:
System / System (0) / waveware / Security

The option 'Make field rights configurable' is to be activated in the area 'Security', to make the functionality for the current data world usable.
Use Field Rights
Field rights can be set up for Objects, Transactions and catalogs after their central activation via the Supervisor Options. Field rights cannot be set up for sub-transactions. There is a button for the field rights in the dialog 'Manage Roles' in the right matrix for the configuration:

A click on this button opens another register ('Field Rights'), that lists the fields of the selected table. E.g. for 'Document':

At this point, you can define their rights per field. It refers to negative rights; so the particular authorization is taken by setting a tick. The following authorizations can be refused:
 |
Do not View If the tick is set for a field, a user cannot see this field; it is hidden on the card. In the data selection, these fields are offered for lists and filters, but they are removed during execution (these fields are marked with an icon). This ensures that users with different rights in the same field can easily use common lists and filters in the data selection. |
 |
Do not Edit If the tick is set for a field, a user cannot edit the content of this field; the field is displayed disabled, but the content can be seen. In addition, the field is not offered for the multi action 'Change field'. |
 |
Do not Select These fields for lists and filters are not offered in the data selection. |
 |
Do not Aggregate No aggregate functions are offered for these fields in the data selection. |
Field Rights in the Data Selection
The field right 'Do not view' is also evaluated in the Data Selection. When setting up a selection in the area Filter and List, the restricted fields are visible, but with the warning symbol:

In the result of the selection, these fields are missing. If all fields of a list are invisible in a selection, a message appears when running the selection, that the list without fields cannot be displayed. This ensures that users with different rights in the same field can easily use common lists and filters in the data selection.
The field right 'Do not edit' influences the global data change function (Multi) 'Change Field Contents'. In the Multi-Option 'The input field', only those fields can be selected, that can be also changed (for the field right was not set). During the execution of Multi, internal fields prohibit, that fields are changed, that cannot be changed according to the existing field rights of the users ('Multi: Further Actions').
Field right 'Do not select' completely removes the fields for lists and filters. In addition, they are removed when the list or filter is created by another user with more rights.
'Do not aggregate' removes the aggregate functions for selected fields. They are also deactivated when the list is executed if the list has been created by another user with more rights.
Field Rights from waveware Version 11.200.4370.22
As of waveware version 11.200.4370.22 (July 2023), the use of field rights has been reorganized. Field rights no longer have to be activated in the Supervisor Options, they are always configurable. In addition, the negative rights have been converted into positive rights.
When updating to this version, all adjustments are made automatically so that the set field rights continue to work as in the previous version. With a new installation, all field rights are set and must be removed if a configuration is to be made.
Settings
Click on the 'Settings' tab to set parameters for the current role.
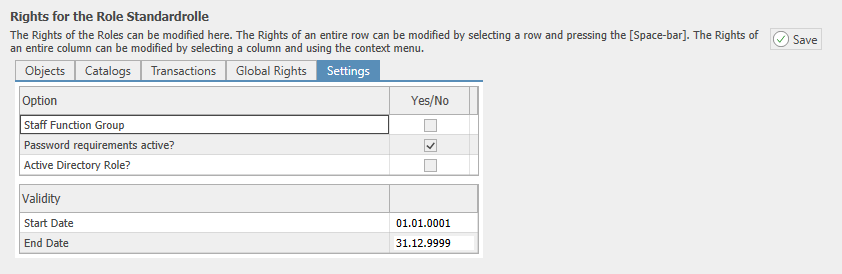
- Staff Functional Group
Is this role also a staff functional group (Yes/No)? If the role is a staff functional group, it cannot be renamed. - Password requirements active?
Do members of this role have the password requirements set in the Supervisor Options? (Yes/No) - Active Directory Role?
Did the role emerge from a group of the same name in Active Directory? (Yes/No)
Further information can be found in the 'Active Directory Interface' documentation. - Validity
Here you can set the period during which the role is valid or during which the rights of this role are granted.
Record Restrictions
Via record restrictions you can set that only certain records in a table are shown to the users. All records in this table can be made invisible this way. You can set for example, a vehicle management system for a user to only show vehicles from the "Volkswagen" manufacturer. The records of all other manufacturers remain hidden.
The restrictions are assigned to users via roles to which the data restrictions are assigned.
Restrictions can be applied to any input field of any table (object, transaction, sub-transaction or catalog type).
To create a record restriction, select a role and then click the 'Restrictions' button. A dialog window opens that shows the restrictions already in place:

In the above example, the users can see only entries in the catalog 'Companies', whose customer ID begins with "23654". Moreover, he sees only the active staff objects.
To add other restrictions, click the button 'Edit'. You can set new restrictions in a new dialog window.

- Select the table ('Table name') for which you want to create a restriction.
- Then click the 'Select and Add Field' button. A window opens where you can see the available field structure and select a field. Double-click a field there or mark a field and click on the green checkmark to confirm.
(As described above, the situation is as of version 11.200.8273.47. In earlier versions, the field can be selected directly after 'Select field'.)
- Create the restriction input by clicking the button 'Create new restriction for this field' at the right side of the 'Field name'. A new row is now generated in the list.
- You can also create multiple nested entries at this point, which can be linked to each other with either "and" or "or".
- You can switch the link operator from the second entry with a click on the first column.
- Priorities are defined with the help of brackets, that are set with a click and is removed from the relevant column with the right click (compare with the 'Filter Criteria' in the data selection).
- After the selection of the Comparison Operator and of the restriction terms, save the new restriction with a click on the button with the green tick.
- The new record restriction is then displayed in the list.
In the standard system, all restrictions that refer to the same table are always linked with "or". As a result, the amount of data displayed increases when a user is assigned additional roles with restrictions on a specific table. With the option 'Restrictions of this role on this table with and link ...', however, the link operator "and" is set for the current restriction. This limits the amount of data displayed in the current table.
Existing record restrictions are easily adjusted. Select a restriction from the list and click the button 'Edit'.
 |
Edit After clicking the previously filled dialog for the adjustment, the existing restriction appears. Change the data according to your perception and click green tick to complete the process. The adjusted record restriction is now displayed in the list with the newly assigned criteria. |
There are two methods available to delete record restrictions:
 |
Delete You can delete the restrictions separately, by selecting them from the list and clicking the button 'Delete'. After a confirmation message, the selected restriction is removed. |
|
Delete all You can remove all the restrictions created for the role. Click the button 'Delete all'. After a confirmation message, all the restricted records are removed. |
Staff Filter
The staff filter enables the limitation of the data restrictions on the particular Staff Entries or Staff Functional Groups. The staff filters can be used on each valid field, except date fields. So the user functions can also be used in restrictions:

The role 'New' should be a staff functional group in this example, which is attached to the data restriction "Staff.staff ID = USER FUNCTIION.Staff ID + options" (see the image above). User 'Facility Manager' and user 'Manager' get this role assigned and they register in waveware. The user 'Manager' (image on the bottom left) and 'Facility Manager' (image on the bottom right) are always shown only the staff object and that of the staff functional group, which are applied on all staff records, for example during a data selection:
 |
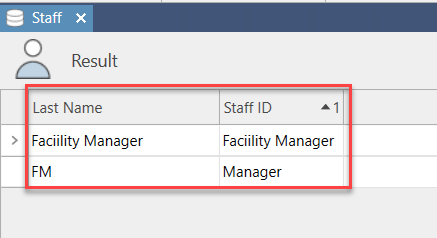 |
| Result for user 'Manager'. | Result for user 'Facility Manager'. |
In the definition of the staff filter, a dialog appears, which offers the following options:

- Load filter term from the staff card of the current user from this field
Set the first tick, when you want to use a filter on the staff card of the currently registered user (or staff functional group). Instead of staff ID (above example), any other enabled field of the staff table can be used for the data selection. - Extend filter on all staff functional groups, to which the current user belongs
The filter is so expanded that it comprises all staff functional groups, to which the currently registered user belongs.
Adjust Client Rights
In a waveware client version, you can allow or disallow different client access for the users. Select a role from the list of all available roles and click the button 'Client rights' to open the management window.
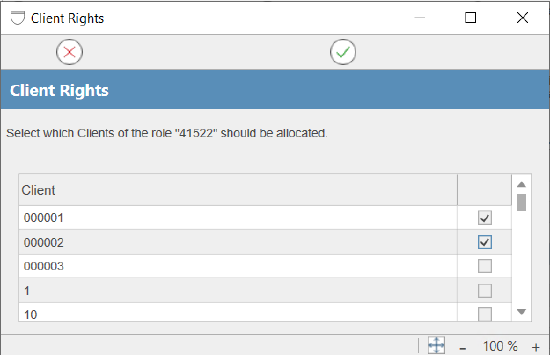
To make available the right for the users, to whom this role is assigned, set the tick at the relevant place and click on the green tick to save.
Reverse User Mapping
In general, users of a role are allocated per Drag and Drop through the user management. You can assign users in the role management of a role through the reverse user mapping. Select a role and click the button 'Assign user'.
Now you can assign user to a current role through the dialog window by setting a tick behind the listed users.
List all Users of a Role
In addition to the dialog for the assignment of the users ('Reverse User Assignment'), there is another option to see all users pf a role. The advantage of this display is that filtering is possible and a good overview in case of too many assigned users can be guaranteed.
For example, if a role "Department manager" is given, the following users are assigned:

Enter any string in the particular header of the table to use filtering. The usage of placeholder characters is not required.
In order to show other users among the users of a selected role, that are assigned a superordinated role, the tick must be activated in 'Show implicit role assignment'. Following the above example, the role "Department manager" of the role "Management" was subordinated (see 'Sub-Roles'). The role "Management" has currently another user ("Miller"), that is now displayed:

Sub-Roles
An existing role can have sub-roles. If for example, the role "Technician" has the sub-roles "Analyzes" and "Development", it means that you must assign a user only the role "Technician", but the user has the rights of both sub-roles. At this point, you could assign the user three roles. Eventually you save work, and the role concept is structured.
After you have selected a role from the role list, you can click the button 'Add sub-roles'. A dialog window opens, which displays several available roles. Select the role, which you want to subordinate to the marked ones and click the button with green tick.

The dialog window is automatically closed and the view appears on the right. In the middle area, on the left of the button 'Add sub-roles', you see the role name displayed as nodes.

Expand these nodes to display the sub-roles assigned to role.
Through this display, you can remove the existing sub-roles. Select the sub-roles to be deleted after expanding the nodes and click the button 'Delete selected sub-role'. After a confirmation message, the shortcut is deleted.
Role 'Supervisor'
The role 'Supervisor' is the administrator role in waveware. It is automatically assigned to the Supervisor.
You can neither adjust nor delete this role (and also the user 'Supervisor'). Assign a role to another user to give it entire administrator rights.
Alternatively the right 'Restricted Administrator' can be used, that however enables only the processing of users and role assignment for particular clients. Consider 'Global Rights: General'.