Set up Web Server
Overview
The waveware Server has a an integrated web server, which inherits, for example the deployment of the ClickOnce Installation Procedure and waveware web. Two settings are important for this web server:
- Address, under which the web server runs (Web Server Address)
- In the install ID: Address, through which the web server is to be accessed (Accessibility of the Web Server)
At the first moment, it is unusual, that one can configure under which address of the web server runs and also under which address the web server is to be accessed. In general, one can assume that it refers to one and the same address. However, this is not the same in all cases.
For example, if a reverse proxy is deployed, the address under which the waveware web server is to be accessed, is the address of the reverse proxy server and not the direct address of the waveware web server. Another example would be, when the web server is to be connected with all network ports, which occur through the address data "http://+:Port/". This address is not a valid external address.
Configuration of the Web Server Address
To configure the address of the Web server, click the button 'waveware Server Settings' in the DataManagement.
In the 'Web server' area you can set various options for the web server. Among other things, URLs can be stored that are located behind the links "Imprint" and "Privacy Policy" in the login window.
Moreover, you can configure a list of addresses there, through which the web is subsequently accessible. In most of the cases, an address of the form "http://+:Port/" is the best choice, as you are sure, that the web server responds to all servers of the connected network ports.
Deviating from that, it is also possible to limit the accessibility to individual network ports. You can specify an address of the form "http://192.168.10.1:Port" there, as long as the server on which the web server runs, has the command of an interface with this IP address.

Use Cache
Using the local data cache improve performance when calling CustomPages and the waveware Web. For this purpose, in the settings of the waveware server, the extensions of static files are stored, which should be held locally on the client computer. In addition, the local file retrieval period (in minutes) per file extension can be set.
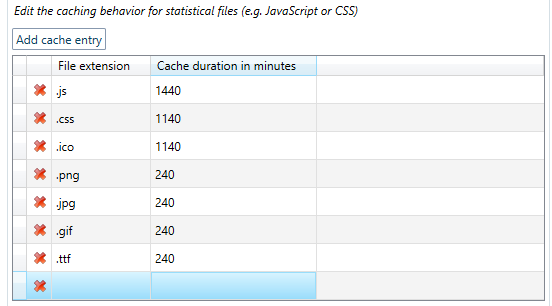
In this way, a file is only retrieved from the web server at the first call and after the expiration of the update period. Additional calls are served from the local cache of the client computer. If, for example, ".png", ".jpg" and ".gif" are stored in the settings, the retrieval of images will no longer burden the bandwidth to the web server so much.
To add a new file extension, click 'Add cache entry'. A new line is created with an example (".js" - "240"). Change the file extension accordingly and set the duration.
Apply Filtering
With the help of the access filters, you can set, which client computer can access the Web server. In the basic configuration, no filter is set: each client can access. The functionality is activated with the first entry.
In the text field near the button 'Add filter', enter a name resolvable in the network or an IP address of the computer to which you want to allow an access.

Computer, which is not explicitly specified, gets the error 403 (forbidden) when calling Web server. Restart the service of the waveware server, so that the settings are successfully applied.
SSL Configuration
To be able to use the construction coded connections, Microsoft Windows® and waveware must be correspondingly configured. For the coding, HTTPS with TLS are used, which require a certificate loaded on the server computer. Below is explained, how to create a certificate requirement and how the certificate can be loaded.
Create Certificate Requirement
For the preparation of the successful SSL configuration, a "Fully qualified domain name" (FQDN) is necessary, which needs to be defined in advance. Below, "www.waveware.info" is used as an example. The certificate, which is created in the next step, is valid for this domain name and not for „waveware.info“, sub-domains or other variations. If you already use a valid certificate, you can continue with Load to the Server at this point.
The following queries and information on the computer administration are the basis of the free Software "OpenSSL (http://openssl.org)". Alternatively, Windows® Systems, which need tools, depending on the version, are available in various variations.
A private key is necessary, which is created with the following command in a command line application (cmd.exe):
openssl genrsa -des3 -out www.waveware.info.key 2048
When executing a command, a password is requested, which is needed in the further process. The command stores the key as a file "www.waveware.info.key".
To get a valid certificate, a file must be generated, that keeps the information on the identification of the creator. This is generated with an OpenSSL command as follows:
openssl req -new -key www.waveware.info.key -out www.waveware.info.csr
When executing a command, a password is requested, that was set prior to the creation of the private key. Probably, a configuration file must be specified with the command extension:
-config openssl.cfg
In the further process, the extended user data are required, that correspond to the following:

The certificate requirement is now available as file "www.waveware.info.csr". With the help of this file, the certificate can be requested from a trustworthy certificate authority.
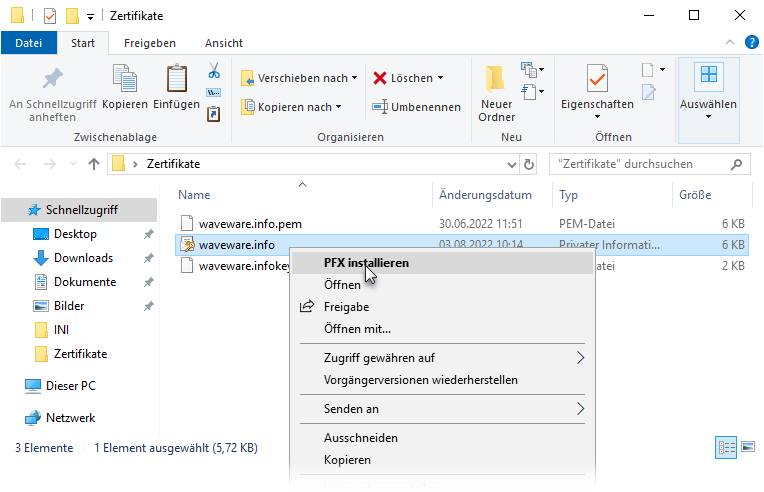
Import Certificate
Once you have got a valid certificate from a certificate authority, you can import it into the server. To do this, right-click on the certificate and select 'install'.
.png?revision=1&size=bestfit&width=603&height=388)
You can use the certificate import wizard to store the new certificate in the Windows certificate store.

In the first step select the storage location 'Local Computer' and in the next step check the file name of the certificate. Then enter the password.
Next, the service account under which the waveware server is running must be authorized. To do this, open the MMC (Management Console) for certificates and select the imported certificate.
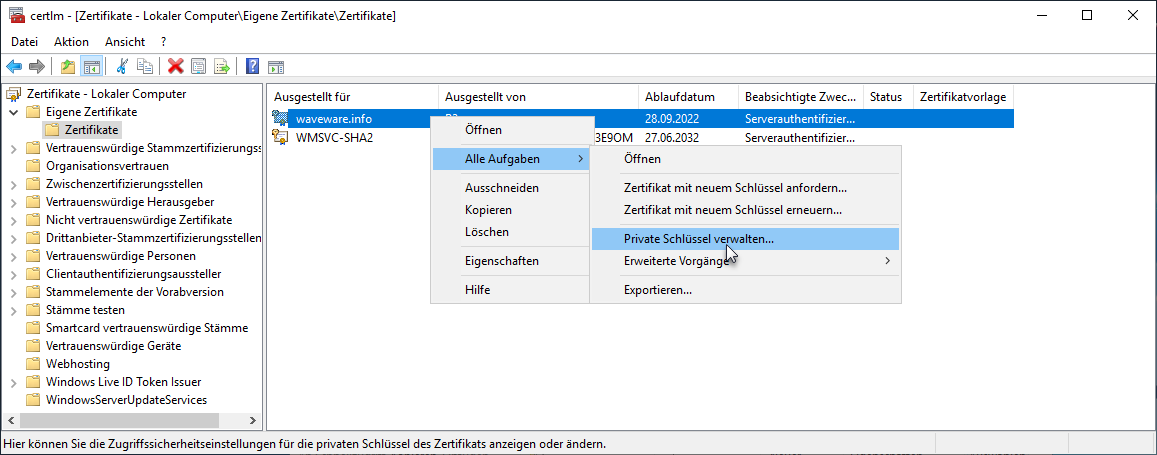
In the context menu click on 'All tasks / Manage private keys'. Then add the account of the waveware server.

After the import and the customization of permissions, the "thumbprint" is required in the next step, which can be read out after double-clicking on the imported certificate (under 'Details').
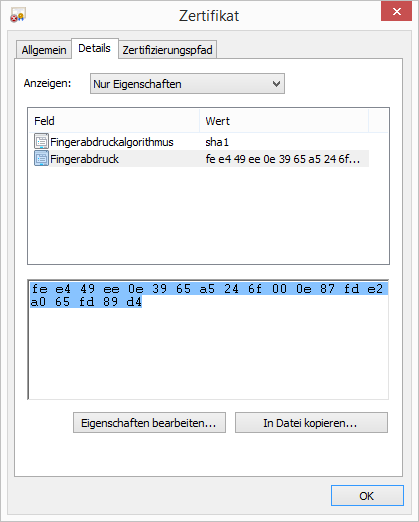
Record Fingerprint of the Certificate in the Web Server
When configuring the Web Server Address, you have a field 'Fingerprint of the SSL Certificate', where the previously noted thumbprint (without space) must be entered. Make sure beforehand, that a valid protocol ("https://") was previously uploaded in the 'Prefix'. Only then, the input of the finger print is possible.

Configuration of the Web Server Accessibility
The accessibility of the Web Server is configured separately for each install ID. This allows for example to use various reverse proxies / network ports for various install IDs and thus allows also a load sharing.
Click the button 'Manage Install ID' in the ribbon of the the DataMangement. You can find there a list of the available install IDs. You can set a Web address for each install ID in the field 'Url', under which the Web server is accessible. The default setting is here "http://localhost:10000/". However, this functions only if both the Client and the Server are located on the same computer. Assume that the Web server would be configured so that it is recallable under the URL "http://+:10000/" and the server computer has the command of the following network ports:
- 192.168.10.1
- 192.168.20.20
In this case, the field 'Url' must indicate either the address "http://192.168.10.1:10000/" or "http://192.168.20.20:10000". Of course, the requirement is that the client computer can access at least one of these server ports.
